Node Unblocker, a versatile Node JS library built on the Express framework, is primarily designed for proxying and rewriting remote web pages. This library allows the creation of a server instance on your local machine which serves as a proxy. It effectively enables users to bypass geographical and other access limitations by rerouting requests from the local machine to the intended destination server and back.
The setup process for Node Unblocker is straightforward, requiring only a few lines of code to initiate on almost any machine. This simplicity extends to its operation, where it enhances functionality by rewriting URLs. It prefixes URLs with “/proxy/” before the HTTP protocol, a modification that aids in overcoming local network barriers.
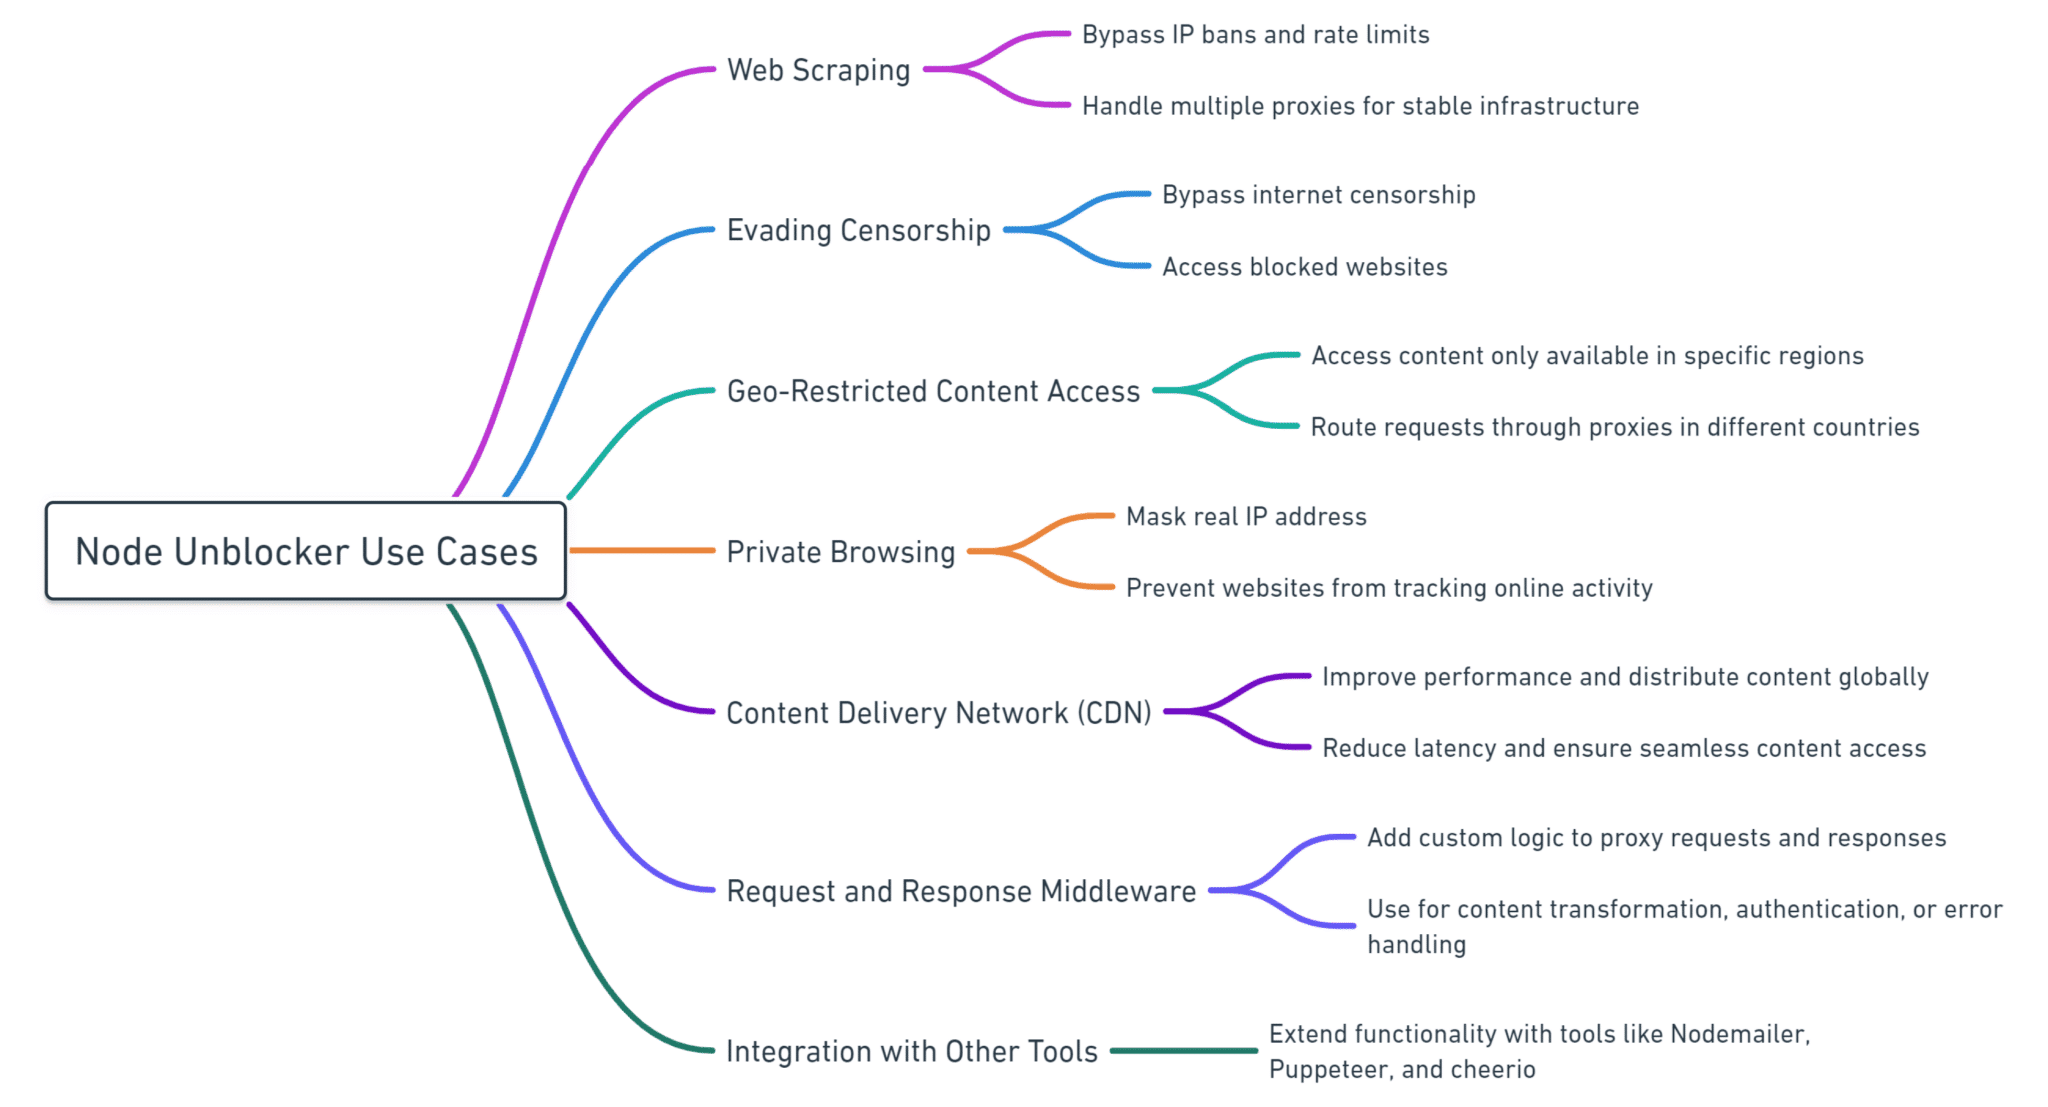
Node Unblocker is particularly beneficial for web scraping activities, offering a feasible solution for those utilizing cloud services or third-party machines. By setting up Node Unblocker on these platforms, users can establish a reliable proxy for scraping data.
However, Node Unblocker does have its constraints. It struggles with certain complex web pages, particularly those on social media platforms that employ technologies like postMessage, which Node Unblocker cannot process. Similarly, websites that use AJAX or require OAuth authentication present challenges for this library.
In terms of operation, Node Unblocker functions by generating a web proxy server on a local machine. It processes and forwards HTTP requests between the origin and destination servers. While it can serve as a basic web proxy, Node Unblocker is enhanced by several advanced features that extend its utility beyond mere request forwarding.
Key features and customizations available through Node Unblocker’s middleware include:
- Content Security Policy (CSP) Removal: This feature, while potentially risky, enables the execution of inline scripts and aids in handling content loaded dynamically via JavaScript.
- Cookie Management: Utilizing cookies can facilitate maintaining user sessions, navigating multi-step processes, and potentially reducing the likelihood of being blocked.
- Handling Redirects: This functionality ensures that redirects are properly processed through the proxy, enhancing reliability.
- Middleware Customizations: These adjustments allow users to alter request and response behaviors, such as modifying request headers, which is particularly useful in web scraping and similar applications.
Furthermore, Node Unblocker allows for extensive configuration adjustments via its setup file, including options like controlling JavaScript execution through the proxy, which can be disabled as per user requirements. These extensive customization options make Node Unblocker a valuable tool for those with access to an extensive proxy pool, offering a robust solution for complex web scraping and data collection tasks.
Essential Setup for Node Unblocker Implementation
For individuals embarking on setting up Node Unblocker with minimal prior setup, certain prerequisites are essential to ensure a smooth start.
Key Requirements
- Node.js Environment
Installation of Node.js is fundamental as it provides the runtime environment necessary for running Node Unblocker. - Integrated Development Environment (IDE)
Selecting an IDE is crucial for code development and management. Examples include Atom and Webstorm. This guide will continue with Webstorm, although the underlying principles are applicable across any IDE. - Cloud Service Provider
Utilizing a cloud service provider enhances the effectiveness of Node Unblocker by allowing operations via external IP addresses, thus optimizing it for web scraping.
Node.js Installation and Initial Setup
After setting up your IDE, the next step involves initializing a Node.js project via the terminal with the following command:
npm init -yThis command streamlines the setup by automatically filling in default values for project metadata.
Following initialization, the next step is to install essential packages:
npm install unblocker expressThese commands add Unblocker and Express to your project, facilitating the creation of a server.
Incorporating Necessary Libraries
Begin by importing the required libraries into your project file:
const express = require('express');
const Unblocker = require('unblocker');
Using const ensures these variables remain constant throughout the application.
Configuring the Web Proxy
Set up your application server and Unblocker instance with:
const app = express();
const unblocker = new Unblocker({prefix: '/proxy/'});
app.use(unblocker);
This configuration ensures all proxied requests utilize the ‘/proxy/’ prefix, separating them from regular traffic.
Optionally, define a custom port:
const port = 3000;Launching the Server
To activate your server:
app.listen(process.env.PORT || port || 8080).on('upgrade', unblocker.onUpgrade);
console.log("Node Unblocker Server Running On Port:", process.env.PORT || port || 8080);
This setup ensures the server listens on a specified port and handles protocol upgrades necessary for certain types of network traffic.
Local Server Testing
It’s advisable to test the server locally before deployment:
Navigate to your project directory and start the server:
cd X:\YOUR\PROJECT\FOLDER
node app.js
Using a browser or cURL, verify the server’s functionality by navigating to:
http://localhost:8080/proxy/https://oneproxy.pro/Ensure the correct port number is used to avoid connection issues.
Deploying on a Remote Server
Although local deployment is possible, using a cloud server allows you to access geo-restricted content effectively.
Cloud Deployment Procedure
- Update the
package.jsonto suit the deployment environment. - Choose a cloud provider and set up a virtual machine.
- Through SSH or browser-based interfaces, transfer your project files to the server.
- Adjust server listening settings to accommodate network policies, often necessary on cloud platforms.
app.listen(process.env.PORT || port || 8080, '0.0.0.0').on('upgrade', unblocker.onUpgrade);- Install Node.js on the cloud machine.
- Launch the application:
node app.jsVerify functionality by accessing:
VM_EXTERNAL_IP_ADDRESS:PORT/proxy/https://oneproxy.proAdjust firewall settings if connection issues occur, ensuring HTTP traffic is permitted through the specified port. This comprehensive setup ensures that Node Unblocker is ready for robust web scraping and content access tasks.
Scaling Web Scraping Operations with Node Unblocker
Leveraging Node Unblocker for Initial Projects
Node Unblocker serves as an effective tool for basic web scraping needs and is especially beneficial for smaller projects. By utilizing a cloud service provider, you can deploy Node Unblocker to bypass internet censorship, navigate geo-restrictions, and access a wide range of content. This flexibility makes it suitable for individuals or small teams just beginning to explore the possibilities of web scraping.
Considerations for Long-Term and Large-Scale Scraping
While Node Unblocker is valuable for smaller-scale applications, it’s important to acknowledge the limitations inherent in using a single or few proxy servers:
- Risk of IP Ban: Continuous use of a single IP address for scraping can lead to rapid blacklisting by target websites.
- Scalability: Scaling up with Node Unblocker alone can be challenging if dependent on a limited number of cloud VMs.
Strategies for Expanding Proxy Capabilities
For more extensive projects or higher data demands, consider the following strategies to enhance your scraping efficiency and reduce the risk of blocks:
- Diversify Proxy Sources:
- Multiple Node Unblocker Instances: Deploying multiple proxies across different cloud VMs can help distribute the load and minimize the risk of any single IP getting banned.
- Residential Proxies: These proxies use IP addresses allocated to residential users and are less likely to be detected and blocked compared to datacenter IPs.
- Invest in a Proxy Pool Service:
- Cost Efficiency: Larger proxy services often offer better rates per IP or per GB of data, making them more cost-effective for large-scale operations.
- Advanced Features: Professional proxy services may provide additional features like automatic IP rotation, targeted geographical IP selection, and more sophisticated traffic routing capabilities.
- Compliance with Service Terms:
- Always ensure that your scraping activities comply with the terms of service of both the target websites and your cloud provider. This precaution helps avoid legal issues and service interruptions.
Future Considerations
As your scraping needs grow, continuously evaluate the performance and cost-effectiveness of your tools. Transitioning from a self-managed Node Unblocker setup to a managed proxy service could yield significant benefits in terms of scalability, reliability, and maintenance overhead.
Conclusion
Node Unblocker is an excellent starting point for web scraping, especially for beginners and small-scale projects. However, as your requirements expand, consider transitioning to more robust solutions like commercial proxy pools to ensure sustainable and efficient web scraping operations.


