Are you trying to decide between Puppeteer and Selenium for web scraping? Both are powerful browser automation frameworks, and making the right choice depends on your specific scraping needs and available resources.
To help you make an informed decision, we’ve highlighted the key differences between Puppeteer and Selenium in the table below. Afterward, we will delve into the details and provide a scraping example for each framework to demonstrate their effectiveness in extracting data from web pages.
| Criteria | Puppeteer | Selenium |
|---|---|---|
| Compatible Languages | Only JavaScript is officially supported, but there are unofficial PHP and Python ports | Java, Python, C#, Ruby, PHP, JavaScript, and Kotlin |
| Browser Support | Chromium and experimental Firefox support | Chrome, Safari, Firefox, Opera, Edge, and Internet Explorer |
| Performance | 60% faster than Selenium | Fast |
| Operating System Support | Windows, Linux, and macOS | Windows, Linux, macOS, and Solaris |
| Architecture | Event-driven architecture with headless browser instances | JSONWire protocol on the web driver to control the browser instance |
| Prerequisites | JavaScript package is enough | Selenium Bindings (for the selected programming language) and browser web drivers |
| Community | Smaller community compared to Selenium | Well-established documentation and a large community |
Let’s proceed to discuss these libraries in detail and perform a scraping example with each to illustrate their efficiency in extracting data from a web page.

Puppeteer
Puppeteer is a Node.js library that provides a high-level API to control Chrome or Chromium over the DevTools Protocol. It is designed for automating tasks in Chrome or Chromium, such as taking screenshots, generating PDFs, and navigating pages.
Puppeteer can also be used for testing web pages by simulating user interactions like clicking buttons, filling out forms, and verifying the results displayed.
Advantages of Puppeteer
- Ease of Use: Simple and straightforward to use.
- Bundled with Chromium: No additional setup is required.
- Headless Mode: Runs in headless mode by default but can be configured to run in full browser mode.
- Event-Driven Architecture: Eliminates the need for manual sleep calls in your code.
- Comprehensive Capabilities: Can take screenshots, generate PDFs, and automate all browser actions.
- Performance Management: Offers tools for recording runtime and load performance to optimize and debug your scraper.
- SPA Crawling: Capable of crawling Single Page Applications (SPAs) and generating pre-rendered content (server-side rendering).
- Script Recording: Allows creating Puppeteer scripts by recording actions on the browser using the DevTools console.
Disadvantages of Puppeteer
- Limited Browser Support: Supports fewer browsers compared to Selenium.
- JavaScript Focused: Primarily supports JavaScript, although unofficial ports for Python and PHP exist.
Web Scraping Example with Puppeteer
Let’s go through a Puppeteer web scraping tutorial to extract items from the Crime and Thriller category of the Danube website.
Danube Store: Crime and Thrillers
To get started, import the Puppeteer module and create an asynchronous function to run the Puppeteer code:
const puppeteer = require('puppeteer');

async function main() {
    // Launch a headless browser instance
    const browser = await puppeteer.launch({ headless: true });

    // Create a new page object
    const page = await browser.newPage();

    // Navigate to the target URL and wait until the loading finishes
    await page.goto('https://danube-webshop.herokuapp.com/', { waitUntil: 'networkidle2' });

    // Wait for the left-side bar to load
    await page.waitForSelector('ul.sidebar-list');

    // Click on the first element and wait for the navigation to finish
    await Promise.all([
        page.waitForNavigation(),
        page.click("ul[class='sidebar-list'] > li > a"),
    ]);

    // Wait for the book previews to load
    await page.waitForSelector("li[class='preview']");

    // Extract the book previews
    const books = await page.evaluateHandle(
        () => [...document.querySelectorAll("li[class='preview']")]
    );

    // Extract the relevant data using page.evaluate
    const processed_data = await page.evaluate(elements => {
        let data = [];
        elements.forEach(element => {
            let title = element.querySelector("div.preview-title").innerHTML;
            let author = element.querySelector("div.preview-author").innerHTML;
            let rating = element.querySelector("div.preview-details > p.preview-rating").innerHTML;
            let price = element.querySelector("div.preview-details > p.preview-price").innerHTML;

            let result = { title, author, rating, price };
            data.push(result);
        });
        return data;
    }, books);

    // Print out the extracted data
    console.log(processed_data);

    // Close the page and browser respectively
    await page.close();
    await browser.close();
}

// Run the main function to scrape the data
main();
Expected Output
When you run the code, the output should resemble the following:
[
    {
        title: 'Does the Sun Also Rise?',
        author: 'Ernst Doubtingway',
        rating: '★★★★☆',
        price: '$9.95'
    },
    {
        title: 'The Insiders',
        author: 'E. S. Hilton',
        rating: '★★★★☆',
        price: '$9.95'
    },
    {
        title: 'A Citrussy Clock',
        author: 'Bethany Urges',
        rating: '★★★★★',
        price: '$9.95'
    }
]
Another Example of Using Puppeteer
In addition to scraping data from web pages, Puppeteer can be used for a variety of automation tasks. One common use case is to generate a PDF of a webpage. Let’s walk through an example where Puppeteer is used to generate a PDF from a web page.
Generating a PDF with Puppeteer
Step 1: Import Puppeteer and Create an Asynchronous Function
const puppeteer = require('puppeteer');

async function generatePDF() {
    // Launch a headless browser instance
    const browser = await puppeteer.launch({ headless: true });

    // Create a new page object
    const page = await browser.newPage();

    // Navigate to the target URL
    await page.goto('https://example.com', { waitUntil: 'networkidle2' });

    // Generate a PDF from the web page
    await page.pdf({
        path: 'example.pdf', // Output file path
        format: 'A4',        // Paper format
        printBackground: true, // Include background graphics
    });

    // Close the page and browser respectively
    await page.close();
    await browser.close();
}

// Run the function to generate the PDF
generatePDF();
Additional Puppeteer Options
Puppeteer provides several options for generating PDFs that can be customized to suit your needs. Here are some of the options you can use:
path: The file path to save the PDF.format: The paper format (e.g., ‘A4’, ‘Letter’).printBackground: Whether to include the background graphics.landscape: Set totruefor landscape orientation.margin: Specify margins for the PDF (top, right, bottom, left).
Example with Additional Options:
const puppeteer = require('puppeteer');

async function generatePDF() {
    const browser = await puppeteer.launch({ headless: true });
    const page = await browser.newPage();
    await page.goto('https://example.com', { waitUntil: 'networkidle2' });

    await page.pdf({
        path: 'example.pdf',
        format: 'A4',
        printBackground: true,
        landscape: true,
        margin: {
            top: '20px',
            right: '20px',
            bottom: '20px',
            left: '20px',
        },
    });

    await page.close();
    await browser.close();
}

generatePDF();
Example Output
Running the above code will create a PDF file named example.pdf in the current directory with the contents of the web page https://example.com.
Puppeteer is a versatile tool for web automation tasks, from scraping data to generating PDFs. Its ease of use and powerful features make it an excellent choice for automating a wide range of browser activities. Whether you’re scraping data, generating reports, or testing web pages, Puppeteer provides the tools you need to get the job done efficiently.

Selenium
Selenium is an open-source end-to-end testing and web automation tool often used for web scraping. Its main components include Selenium IDE, Selenium WebDriver, and Selenium Grid.
- Selenium IDE: Used to record actions before automating them.
- Selenium WebDriver: Executes commands in the browser.
- Selenium Grid: Enables parallel execution.
Advantages of Selenium
- Ease of Use: Simple and straightforward to use.
- Language Support: Supports various programming languages such as Python, Java, JavaScript, Ruby, and C#.
- Browser Automation: Can automate browsers like Firefox, Edge, Safari, and even custom QtWebKit browsers.
- Scalability: Possible to scale Selenium to hundreds of instances using cloud servers with different browser settings.
- Cross-Platform: Operates on Windows, macOS, and Linux.
Disadvantages of Selenium
- Complex Setup: Selenium setup methods can be complex.
Web Scraping Sample with Selenium
As with Puppeteer, let’s go through a tutorial on web scraping with Selenium using the same target site. We’ll extract the book previews from the Crime and Thriller category of the Danube website.
Danube Store: Crime and Thrillers
Step 1: Import the Necessary Modules and Configure Selenium
import time
from selenium import webdriver
from selenium.webdriver.common.by import By

options = webdriver.ChromeOptions()
options.add_argument("--headless")
Step 2: Initialize the Chrome WebDriver
driver = webdriver.Chrome(options=options)Step 3: Navigate to the Target Website
time.sleep(1)
crime_n_thrillers = driver.find_element(By.CSS_SELECTOR, "ul[class='sidebar-list'] > li")
crime_n_thrillers.click()
time.sleep(1)
books = driver.find_elements(By.CSS_SELECTOR, "div.shop-content li.preview")
Step 4: Click on the Crime & Thrillers Category and Extract Book Previews
time.sleep(1)
crime_n_thrillers = driver.find_element(By.CSS_SELECTOR, "ul[class='sidebar-list'] > li")
crime_n_thrillers.click()
time.sleep(1)
books = driver.find_elements(By.CSS_SELECTOR, "div.shop-content li.preview")
Step 5: Define a Function to Extract Data from Each Book Preview
def extract(element):
    title = element.find_element(By.CSS_SELECTOR, "div.preview-title").text
    author = element.find_element(By.CSS_SELECTOR, "div.preview-author").text
    rating = element.find_element(By.CSS_SELECTOR, "div.preview-details p.preview-rating").text
    price = element.find_element(By.CSS_SELECTOR, "div.preview-details p.preview-price").text
    return {"title": title, "author": author, "rating": rating, "price": price}
Step 6: Loop Through the Previews, Extract the Data, and Quit the Driver
extracted_data = []
for element in books:
    data = extract(element)
    extracted_data.append(data)

print(extracted_data)
driver.quit()
Expected Output
Running the above code will produce an output similar to the following:
[
    {'title': 'Does the Sun Also Rise?', 'author': 'Ernst Doubtingway', 'rating': '★★★★☆', 'price': '$9.95'},
    {'title': 'The Insiders', 'author': 'E. S. Hilton', 'rating': '★★★★☆', 'price': '$9.95'},
    {'title': 'A Citrussy Clock', 'author': 'Bethany Urges', 'rating': '★★★★★', 'price': '$9.95'}
]
Additional Selenium Example: Taking a Screenshot
In addition to scraping data, Selenium can also be used to take screenshots of web pages. Here’s an example of how to take a screenshot of a web page using Selenium.
Step 1: Import the Necessary Modules and Configure Selenium
from selenium import webdriver

options = webdriver.ChromeOptions()
options.add_argument("--headless")
Step 2: Initialize the Chrome WebDriver
driver = webdriver.Chrome(options=options)Step 3: Navigate to the Target Website
url = "https://example.com"
driver.get(url)
Step 4: Take a Screenshot
driver.save_screenshot("example_screenshot.png")Step 5: Quit the Driver
driver.quit()Selenium is a versatile tool for web automation tasks, including web scraping and taking screenshots. Its support for multiple programming languages and browsers, along with its scalability, makes it a powerful choice for various automation needs. Whether you’re extracting data or generating reports, Selenium provides the capabilities to automate your tasks efficiently.
Puppeteer vs. Selenium: Speed Comparison
Is Puppeteer faster than Selenium? The answer is yes—Puppeteer is generally faster than Selenium.
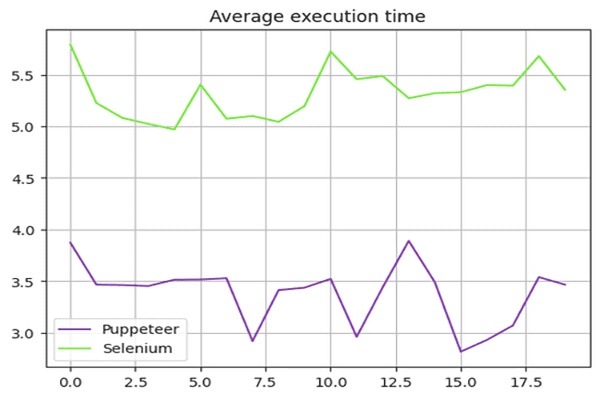
To compare the speed of Puppeteer and Selenium, we used the Danube-store sandbox and ran the scripts presented above 20 times, averaging the execution times.
Selenium Speed Test
We used the time module in Python to measure the execution time of the Selenium script. The start time was recorded at the beginning and the end time at the end of the script. The difference between these times provided the total execution duration.
Here is the complete script used for Selenium:
import time
from selenium import webdriver
from selenium.webdriver.common.by import By
from selenium.webdriver.support.ui import WebDriverWait
from selenium.webdriver.support import expected_conditions as EC

def extract(element):
    title = element.find_element(By.CSS_SELECTOR, "div.preview-title").text
    author = element.find_element(By.CSS_SELECTOR, "div.preview-author").text
    rating = element.find_element(By.CSS_SELECTOR, "div.preview-details p.preview-rating").text
    price = element.find_element(By.CSS_SELECTOR, "div.preview-details p.preview-price").text
    return {"title": title, "author": author, "rating": rating, "price": price}

# Start the timer
start_time = time.time()

options = webdriver.ChromeOptions()
options.add_argument("--headless")

# Create a new instance of the Chrome driver
driver = webdriver.Chrome(options=options)

url = "https://danube-webshop.herokuapp.com/"
driver.get(url)

# Click on the Crime & Thrillers category
time.sleep(1)
crime_n_thrillers = driver.find_element(By.CSS_SELECTOR, "ul[class='sidebar-list'] > li")
crime_n_thrillers.click()
time.sleep(1)

# Extract the book previews
books = driver.find_elements(By.CSS_SELECTOR, "div.shop-content li.preview")

extracted_data = []
for element in books:
    data = extract(element)
    extracted_data.append(data)

print(extracted_data)

# End the timer
end_time = time.time()
print(f"The whole script took: {end_time - start_time:.4f} seconds")

driver.quit()
Puppeteer Speed Test
For the Puppeteer script, we used the Date object to measure the execution time. The start time was recorded at the beginning and the end time at the end of the script. The difference between these times provided the total execution duration.
Here is the complete script used for Puppeteer:
const puppeteer = require('puppeteer');

async function main() {
    const start = Date.now();

    const browser = await puppeteer.launch({ headless: true });
    const page = await browser.newPage();
    await page.goto('https://danube-webshop.herokuapp.com/', { waitUntil: 'networkidle2' });

    await page.waitForSelector('ul.sidebar-list');

    await Promise.all([
        page.waitForNavigation(),
        page.click("ul[class='sidebar-list'] > li > a"),
    ]);

    await page.waitForSelector("li[class='preview']");
    const books = await page.evaluateHandle(
        () => [...document.querySelectorAll("li[class='preview']")]
    );

    const processed_data = await page.evaluate(elements => {
        let data = [];
        elements.forEach(element => {
            let title = element.querySelector("div.preview-title").innerHTML;
            let author = element.querySelector("div.preview-author").innerHTML;
            let rating = element.querySelector("div.preview-details > p.preview-rating").innerHTML;
            let price = element.querySelector("div.preview-details > p.preview-price").innerHTML;

            let result = { title, author, rating, price };
            data.push(result);
        });
        return data;
    }, books);

    console.log(processed_data);
    await page.close();
    await browser.close();

    const end = Date.now();
    console.log(`Execution time: ${(end - start) / 1000} seconds`);
}

main();
Performance Test Results
The performance tests showed that Puppeteer is about 60% faster than Selenium. This speed advantage makes Puppeteer a more suitable choice for projects requiring high-speed web scraping and automation, especially when working with Chromium-based browsers.
Speed Results Summary:

The chart below illustrates the performance difference between Puppeteer and Selenium:
Scaling up Puppeteer applications for projects requiring fast, efficient web scraping is the optimal choice in this context.
Puppeteer vs. Selenium: Which Is Better?
So which one is better between Selenium and Puppeteer for scraping? There isn’t a direct answer to that question since it depends on multiple factors, such as long-term library support, cross-browser support, and your web scraping needs.
Puppeteer is faster, but compared to Selenium, it supports fewer browsers. Selenium also supports more programming languages compared to Puppeteer.
Conclusion
Although using Puppeteer or Selenium is a good option for web scraping, scaling up and optimizing your web scraping project can be challenging because advanced anti-bot measures can detect and block these libraries. The best way to avoid this is by using a web scraping API, like OneProxy.
Using Puppeteer with Proxy Servers
To use Puppeteer with a proxy server, you can pass the proxy settings in the args option when launching the browser instance. Here’s an example:
const puppeteer = require('puppeteer');

async function main() {
    const proxyServer = 'http://your-proxy-server:port';

    const browser = await puppeteer.launch({
        headless: true,
        args: [`--proxy-server=${proxyServer}`]
    });

    const page = await browser.newPage();
    await page.goto('https://example.com', { waitUntil: 'networkidle2' });

    // Perform your web scraping tasks here

    await browser.close();
}

main();
Using Selenium with Proxy Servers
To use Selenium with a proxy server, you can set the proxy options using the webdriver.Proxy class. Here’s an example:
from selenium import webdriver
from selenium.webdriver.common.proxy import Proxy, ProxyType

proxy = Proxy()
proxy.proxy_type = ProxyType.MANUAL
proxy.http_proxy = "your-proxy-server:port"
proxy.ssl_proxy = "your-proxy-server:port"

capabilities = webdriver.DesiredCapabilities.CHROME
proxy.add_to_capabilities(capabilities)

options = webdriver.ChromeOptions()
options.add_argument("--headless")

driver = webdriver.Chrome(desired_capabilities=capabilities, options=options)
driver.get("https://example.com")

# Perform your web scraping tasks here

driver.quit()
Using proxy servers with Puppeteer and Selenium can help bypass IP-based restrictions and reduce the risk of getting blocked, enhancing the efficiency of your web scraping tasks. OneProxy’s rotating proxies can further optimize this process, providing a seamless scraping experience.


